GM 14 bolt swap into a 1/2 ton chassis
This is a common swap done by many in the 4×4 world to beef up there 1/2 ton or c-clip axles. Other than the larger and beefier ring and pinion the major benefit of this swap is the full floating axles. The difference is that when a c-clip axle breaks the axle will slide out of the diff as only a c-clip holds it in inside the carrier. The full floater s axel is bolted on x-tearnally on the outer axle and the drums are spindle mounted. That means if you snap a 30 spline 14 bolt axle , you can still wheel your rig out to safety as your wheel wont fall off! Now to be warned , there is a 14 bolt “semi floater” that exists ans has a smaller ring gear and has c-clip axles. This is NOT what you are looking for and the easy way to tell the difference is to look for the tell tale axles sticking through the center of the rims.
Other than the acquisition of the axle,one of the only parts to buy for the rear axle swap is the u-joint. It is a hybrid unit that is made up of a 1310 and a 1350 blended. A common part # for your local parts depot is 3-3140. It is usually a 15 to 20 dollar unit. Now I recomend checking all seals and bearings as this is the time to do any routine maintenance while the diff is out.
If your doner 14 bolt is out of a pickup the width drum to drum will remain the same. Now Ive been told there are 3 or 4 different types in existence,all varying widths. Check this before purchasing. All the diffs are the same leaf to leaf so your 1/2 ton springs will stay put. Now check the gear ratio. If you can pull the diff cover the #s are stamped into the ring gear, just divide the #s and there’s your ratio. The e-brake cables will also work under your rig so try to get a diff with the cables still attached. You will appreciate this later. You also want the u-bolts and u-bolt plates from the doner vehicle as the axle tubes are larger in diameter .The u-joint straps HAVE to come with the diff. They are hard to find and cannot be bought new.
Now for the installation,its straight forward. Safely jack up the truck,very high, and chock the front wheels.Remove the shocks from the diff(you can leave them connected on top),disconnect the e-brake cables,remove the drive shaft,remove the brake lines by removing the left and right hard lines off of the distribution block,put a good jack under the diff and remove the u-bolts. This last step is done WAY easier with air tools. The bolts are fine thread and take forever by hand. Lastly,change over that special u-joint on your old drive shaft.
Installation is easier with 2 people and I strongly recommend you don’t try this yourself. Parts are heavy and you can always use another brain when things go screwy. Be sure to align the pins on the leaf springs to the diff and replace any angled shims for pinion angle if they were there. Replace the rest of the parts as they came off and bleed the brakes. All the parts like shocks and brake lines are interchangeable from truck to truck. Fill up the diff fluid and grease your u-joint and ta-dum, you have a bullet-proof rear diff.
This is the parts break down. 3 quarts gear oil, u-joint,diff gasket,grease for u-joint,brake fluid,and replace any worn parts. This set of instructions are for reference only and I am sure things will vary etc. This was just the way I budget built my blazer. The front diff is a whole nother story. I got lucky and my truck was already a 3:73 set so I left my 10 bolt and swapped 8 lug hubs onto my axle. The calipers are the same,as are the bearings. You really just need the backing plates(one piece NOT THE 2 PIECE) and the hubs. The locking hubs off of your 1/2 ton even work! Now if you are lucky enough to get a matching 8 lug dana 44 or 10 bolt the swap is exactly that. All the parts un bolt and replace each other. One last note, You can run 15 inch rims on your 3/4 ton truck as they clear the rear easily but you have to grind the heck out of the front backing plates and caliper. Its not worth it. If you can go to a 16 inch or 16.5 inch rim do so. I had nothing but problems When I i did it and even still had to run 3/16 inch spacers on the front. Just a warning. Good luck, and here are a couple of pics, nothing in process, just before and after.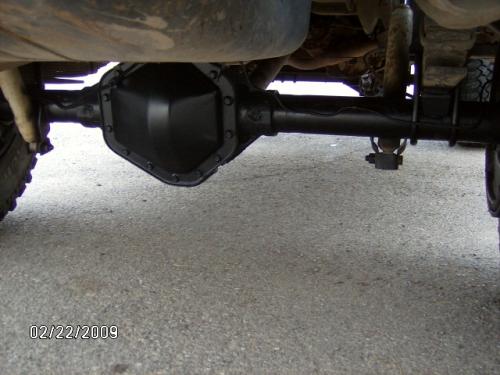

Tags: 14, axle, bearing, blazer, Builds, carrier, install, installer, mounting, new, pickup, ratio, rear, removal, remove, safety, truck, vehicle, wheeling
Wednesday, April 8th, 2009 at 07:53 • K5 Blazer • RSS 2.0 feed • leave a response or trackback
I set up my 1st Wrecker which was a modified 1/2 w/a Dana 70 & dually wheels. Also I made a cradle for the frame so it wouldn’t buckel under heavy loads…
Awesome blog article.Really thank you! Much obliged.
Thanks, I am getting ready to do this swap and this is a great resource for gathering up my parts.
[…] for 35’s and they are quite pricy for it as well. Here is a writeup my buddy did after doing his Motor Mayhem